The Matrix is useful if no other type can handle your question. The reason for this is that the matrix question gives you extreme flexibility to construct your question.
A matrix question is essentially a table with columns, rows and cells. Each cell may contain a label, text field, numeric field, drop down list, checkbox or radio-button. It can also be empty.
Creating a matrix is a two-step process:
set the size of the matrix, and select type. From here, you can define how the cells in the matrix are going to relate to each other by selecting the right type:
- rating: scale. This means that each row in the cell group can be rated with a value horizontally. You should then supply with a label for each row and each column.
- ranking: makes it possible to enforce a response with one (and only one) selection per column.
- intersection: Allow for one selection for the entire cell association - an intersection between the columns and rows.
- checkbox: An association with checkboxes in every cell. Checkboxes represent a true/false answer.
- dual scale: Creates two associations. Makes it possible to do rating and importance for each item in the left column.
- custom: allows for any type of input in each cell. This type of association does not impose a strong relation between the cells, other than a common background color (if selected), and a heading.
- configure all the cells.
Explanation of the matrix screen and attributes:

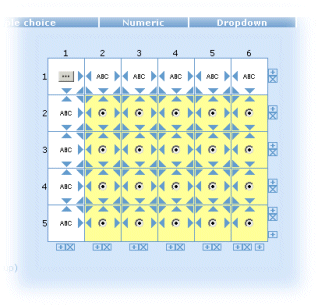
- An empty cell. Click on the "..."-button and set the type from the dialog window that appear.
- Text field. For free-text input.
- Numeric field.
- Drop down. See dropdown list.
- Checkbox. True/false type answer.
- Label.
- Image.
- Insert a new row.
- Delete a row.
- Radio button. Radio buttons can only be used/defined if it is grouped with other cells. See associations below.
- Move a cell. To move that cell to a cell next to it. Left, right, up, down, up-left, up-right, down-left, down-right.
- Delete column.
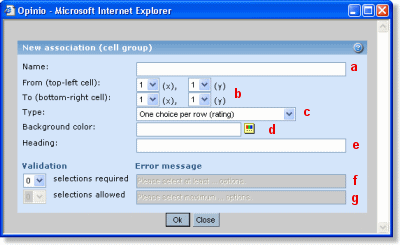
New cell association: To group a number of cells to make it possible to do ratings, rankings etc. When you click this option the following window will open:

- Name: Set the name of the new cell association.
- Choose the cells you want to associate, from top-left cell to bottom-right cell.
Select the type of cells you want for your new cell group:
- rating: scale. This means that each row in the cell group can be rated with a value horizontally. You should then supply with a label for each row and each column.
- ranking: makes it possible to enforce a response with one (and only one) selection per column.
- intersection: Allow for one selection for the entire cell association - an intersection between the columns and rows.
- checkbox: An association with checkboxes in every cell. Checkboxes represent a true/false answer.
- custom: allows for any type of input in each cell. This type of association does not impose a strong relation between the cells, other than a common background color (if selected), and a heading.
- Select the background color of your cell group. Every cell in the cell group will get that color. The color is shown both on the matrix setup page and on the survey form. NOTE: cell background color overrides cell group color.
- Set a heading for your cell group(optional). The heading will be visible in the survey only if it is starts at the first or second row in the matrix.
- Validation: Depending on the type of association, validation may be possible. If you have chosen "select any cell", for example, you can require the respondents to choose at least 3 but at most 5 selections.
- Validation message: Enter the message shown to the respondent if the requirements are not met (validation did not go through).
- Cell associations. Lists the existing cell groups with their assigned color
- Your custom cells.
- Resize the matrix; set the number of rows and columns and click resize. If the matrix are set to smaller size, any cells beyond the new size will be deleted. If the new size is bigger, custom/empty cells will be created.
Here is a small example to give you an idea as to how it looks and works.
Example:

In the above matrix we use a cellgroup with a "one choice pr. row (rating)" attribute and set the background to yellow. There are labels with text on the remaining custom cells, with various font-colors and background colors (colors are not shown in the custom cells - it will only appear on the survey form).
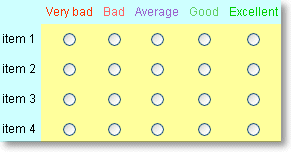
The final result look like this:

Tip:For better control of the space between the labels, you can use html code for "space" ->  . E.g. In a label, write  TEXT . (nbsp = non breaking space). Repeat this code if you need more spaces:    ... The reason you must use this code, is that HTML will ignore more than one space. This space-code will force more spaces. For more tips on HTML, see HTML hints. Another way to control this, is through CSS files. See look and feel.