1. Loading Data
Data can be loaded using the applet parameters.
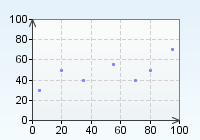
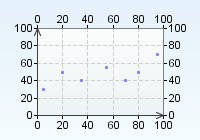
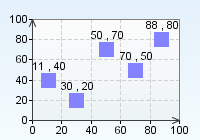
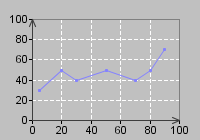
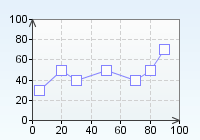
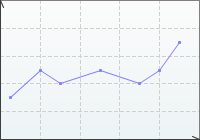
Use the plots parameter to load data into the applet. The applet code below creates a plotter chart and loads the plots using the specified coordinates.
<applet code=com.objectplanet.chart.ChartApplet
archive=chart.ext.jar width=200 height=140>
<param name=chart value="plotter">
<param name=plots value="5|30,20|50,35|40,55|55,70|40,80|50,95|70">
</applet>
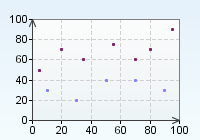
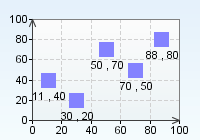
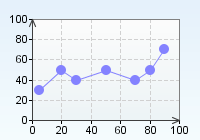
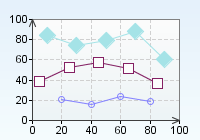
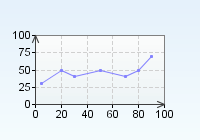
A chart can have multiple data series. Use the seriesCount parameter to control the number of data series, and the plots_N parameter to set the values per data series.
<applet code=com.objectplanet.chart.ChartApplet
archive=chart.ext.jar width=200 height=140>
<param name=chart value="plotter">
<param name=seriesCount value=2>
<param name=plots_0 value="10|30,30|20,50|40,70|40,90|30">
<param name=plots_1 value="5|50,20|70,35|60,55|75,70|60,80|70,95|90">
</applet>
If you want to load the applet or servlet data and parameters from a url, you need specify the url in the data parameter in your applet or servlet tag as below
Applet:
<applet code=com.objectplanet.chart.ChartApplet
archive=chart.ext.jar width=200 height=140>
<param name=chart value="plotter">
<param name=data value="parameters.data">
</applet>
You can also configure the applet to load data from the currently specified data URL at a specific interval.
<applet code=com.objectplanet.chart.ChartApplet
archive=chart.ext.jar width=200 height=140>
<param name=chart value="plotter">
<param name=data value="parameters.data">
<param name=dataInterval value="10">
</applet>
The above applet will reload the parameters.data file at 10 second intervals. If you specify a new data parameter in the parameters.data file, this file will be loaded instead on the next interval.
<param name=dataInterval value="10,reset">
This will make the applet reset all it's data before the new data is loaded.
Servlet:
<img src="http://localhost:8080/servlet/com.objectplanet.chart.ChartServlet?
chart=plotter&
width=200&
height=140&
data=http://somehost/parameters.data">
Only an applet or servlet can load the data from a URL. The parameters.data file looks like this:
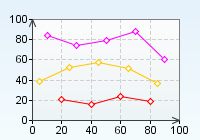
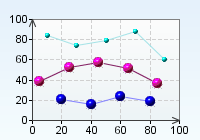
seriesCount=3
plots_0=20|21,40|16,60|24,80|19
plots_1=5|39,25|52,45|57,65|51,85|37
plots_2=10|84,30|74,50|79,70|88,90|60
seriesColors=red,orange,magenta
plotStyle=diamond_opaque
plotSize=6
The data url can point to a script that produces the data as long as the format returned is as in the example above.
If you need to pass parameters to the script when using servlets, & for parameter separation and = for parameter value assignment can not be used. Instead you need to use � as the parameter separator and * for the equals sign.
<img src="http://localhost:8080/servlet/com.objectplanet.chart.ChartServlet?
chart=plotter&
width=200&
height=140&
data=http://somehost/somescript.xyz?myparam*value�anotherparam*anothervalue&
background=white">
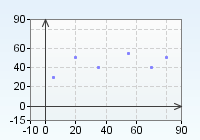
You can control the range explicitly by setting the XUpperRange, XLowerRange and YUpperRange, YLowerRange parameters.
<applet code=com.objectplanet.chart.ChartApplet width=200 height=140>
archive=chart.ext.jar width=200 height=140>
<param name=chart value="plotter">
<param name=seriesCount value=2>
<param name=XUpperRange value=90>
<param name=XLowerRange value=-10>
<param name=YUpperRange value=90>
<param name=YLowerRange value=-15>
<param name=plots value="5|30,20|50,35|40,55|55,70|40,80|50">
</applet>
<applet code=com.objectplanet.chart.ChartApplet width=200 height=140>
archive=chart.ext.jar width=200 height=140>
<param name=chart value="plotter">
<param name=seriesCount value=2>
<param name=XUpperRange value=10>
<param name=XLowerRange value=-90>
<param name=YUpperRange value=15>
<param name=YLowerRange value=-90>
<param name=plots value="-5|-30,-20|-50,-35|-40,-55|-55,-70|-40,-80|-50">
</applet>
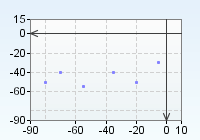
<applet code=com.objectplanet.chart.ChartApplet width=200 height=140>
archive=chart.ext.jar width=200 height=140>
<param name=chart value="plotter">
<param name=seriesCount value=2>
<param name=XUpperRange value=-50>
<param name=XLowerRange value=50>
<param name=YUpperRange value=-50>
<param name=YLowerRange value=50>
<param name=plots value="-40|-10,-25|10,-10|-20,10|25,25|-40,40|30">
</applet>
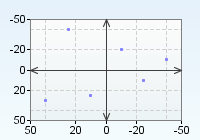
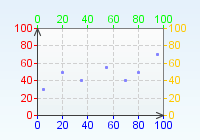
The ranges can be turned on/off at any side of the chart grid (top, left, bottom, right).
<applet code=com.objectplanet.chart.ChartApplet
archive=chart.ext.jar width=200 height=140>
<param name=chart value="plotter">
<param name=plots value="5|30,20|50,35|40,55|55,70|40,80|50,95|70">
<param name=rangeOn value="top,left,bottom,right">
</applet>
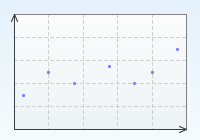
Setting rangeOn to an empty value turns all ranges off.
<applet code=com.objectplanet.chart.ChartApplet
archive=chart.ext.jar width=200 height=140>
<param name=chart value="plotter">
<param name=plots value="5|30,20|50,35|40,55|55,70|40,80|50,95|70">
<param name=rangeOn value="false,false">
</applet>
Set the color of the range labels and ticks using the rangeColor parameter. The parameter value consists of 0 to 4 color values whith the following sequence: top, left, bottom, right. The color values can be the color name or the html hex code color number.
<applet code=com.objectplanet.chart.ChartApplet
archive=chart.ext.jar width=200 height=140>
<param name=chart value="plotter">
<param name=plots value="5|30,20|50,35|40,55|55,70|40,80|50,95|70">
<param name=rangeOn value="top,left,bottom,right">
<param name=rangeColor value="green,red,blue,orange">
</applet>
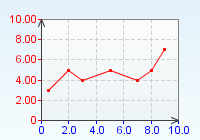
You can set the font used for the range value labels, set the number of decimals to be displayed.
<applet code=com.objectplanet.chart.ChartApplet
archive=chart.ext.jar width=200 height=140>
<param name=chart value="plotter">
<param name=plots value="0.5|3,2|5,3|4,5|5,7|4,8|5,9|7">
<param name=XUpperRange value=10>
<param name=YUpperRange value=10>
<param name=XRangeDecimalCount value=1>
<param name=YRangeDecimalCount value=2>
<param name=rangeColor value="x,red,blue">
<param name=connectedLinesOn value="true">
<param name=seriesColors value="red">
</applet>
Set the font used for the range value labels using the rangeLabelFont parameter.
<applet code=com.objectplanet.chart.ChartApplet
archive=chart.ext.jar width=200 height=140>
<param name=chart value="plotter">
<param name=plots value="0.5|3,2|5,3|4,5|5,7|4,8|5,9|7">
<param name=XUpperRange value=10>
<param name=YUpperRange value=10>
<param name=YRangeDecimalCount value=1>
<param name=rangeColor value="x,red,blue">
<param name=connectedLinesOn value="true">
<param name=seriesColors value="red">
<param name=rangeLabelFont value="Courier,bold,14">
</applet>
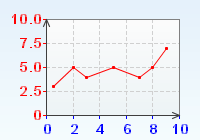
The first argument to the rangeLabelFont_ is the font name, the second is plain, bold, italic, or bolditalic. The last argument is the point size of the font.
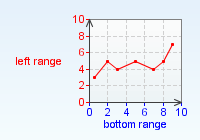
You can add a label to the range axis by using the rangeAxisLabel_ parameter. The position of the label must be specified after the rangeAxisLabel_ and can be right, left, top or bottom.
<applet code=com.objectplanet.chart.ChartApplet
archive=chart.ext.jar width=200 height=140>
<param name=chart value="plotter">
<param name=plots value="0.5|3,2|5,3|4,5|5,7|4,8|5,9|7">
<param name=XUpperRange value=10>
<param name=YUpperRange value=10>
<param name=rangeColor value="x,red,blue">
<param name=connectedLinesOn value="true">
<param name=seriesColors value="red">
<param name=rangeAxisLabel_left value="left range">
<param name=rangeAxisLabel_bottom value="bottom range">
</applet>
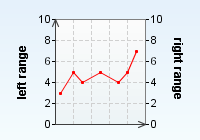
Set the clockwise angle and the font of the label using the rangeAxisLabelAngle_ and rangeAxisLabelFont parameters.
<applet code=com.objectplanet.chart.ChartApplet
archive=chart.ext.jar width=200 height=140>
<param name=chart value="line">
<param name=chart value="plotter">
<param name=plots value="0.5|3,2|5,3|4,5|5,7|4,8|5,9|7">
<param name=XUpperRange value=10>
<param name=YUpperRange value=10>
<param name=rangeOn value="left,right">
<param name=connectedLinesOn value="true">
<param name=seriesColors value="red">
<param name=rangeAxisLabel_left value="left range">
<param name=rangeAxisLabelAngle_left value=270>
<param name=rangeAxisLabel_right value="right range">
<param name=rangeAxisLabelAngle_right value=90>
<param name=rangeAxisLabelFont value="Arial, bold, 12">
</applet>
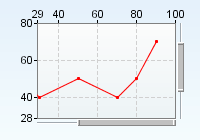
You can control the upper and lower ranges at runtime using the range adjuster.
<applet code=com.objectplanet.chart.ChartApplet
archive=chart.ext.jar width=200 height=140>
<param name=chart value="plotter">
<param name=plots value="5|30,20|50,30|40,50|50,70|40,80|50,90|70">
<param name=XUpperRange value=100>
<param name=YUpperRange value=100>
<param name=rangeOn value="left,top">
<param name=connectedLinesOn value="true">
<param name=seriesColors value="red">
<param name=rangeAdjusterOn_right value=true>
<param name=rangeAdjusterOn_bottom value=true>
</applet>
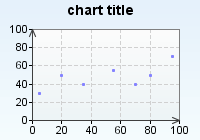
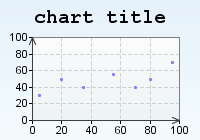
The chartTitle parameter adds a label at the top center of the chart.
<applet code=com.objectplanet.chart.ChartApplet
archive=chart.ext.jar width=200 height=140>
<param name=chart value="plotter">
<param name=plots value="5|30,20|50,35|40,55|55,70|40,80|50,95|70">
<param name=chartTitle value="chart title">
</applet>
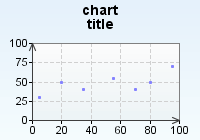
You can have multiline labels by using a \n (goes for all chart labels).
<applet code=com.objectplanet.chart.ChartApplet
archive=chart.ext.jar width=200 height=140>
<param name=chart value="plotter">
<param name=plots value="5|30,20|50,35|40,55|55,70|40,80|50,95|70">
<param name=chartTitle value="chart\ntitle">
</applet>
The titleFont parameter sets the font used for the title.
<applet code=com.objectplanet.chart.ChartApplet
archive=chart.ext.jar width=200 height=140>
<param name=chart value="plotter">
<param name=plots value="5|30,20|50,35|40,55|55,70|40,80|50,95|70">
<param name=chartTitle value="chart title">
<param name=titleFont value="Courier, bold, 20">
</applet>
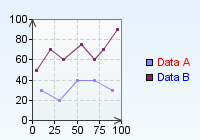
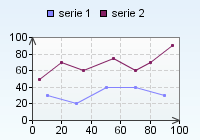
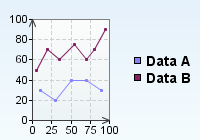
When using multiple data series you set a label for each data series using the seriesLabels parameter. The legend will display the series labels.
<applet code=com.objectplanet.chart.ChartApplet
archive=chart.ext.jar width=200 height=140>
<param name=chart value="plotter">
<param name=seriesCount value=2>
<param name=seriesLabels value="Data A,Data B">
<param name=plots_0 value="10|30,30|20,50|40,70|40,90|30">
<param name=plots_1 value="5|50,20|70,35|60,55|75,70|60,80|70,95|90">
<param name=connectedLinesOn value=true>
<param name=legendOn value=true>
</applet>

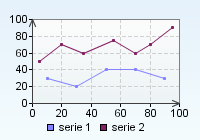
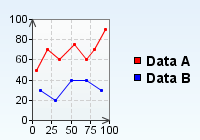
Use the seriesLabelColors to set the colors of the series labels in the legend.
<applet code=com.objectplanet.chart.ChartApplet
archive=chart.ext.jar width=200 height=140>
<param name=chart value="plotter">
<param name=seriesCount value=2>
<param name=seriesLabels value="Data A,Data B">
<param name=plots_0 value="10|30,30|20,50|40,70|40,90|30">
<param name=plots_1 value="5|50,20|70,35|60,55|75,70|60,80|70,95|90">
<param name=connectedLinesOn value=true>
<param name=legendOn value=true>
<param name=seriesLabelColors value="red,blue">
</applet>
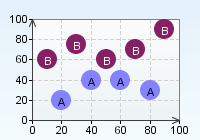
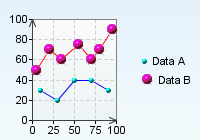
Use the seriesLabelsOn to turn on series labels centered with plots.
<applet code=com.objectplanet.chart.ChartApplet
archive=chart.ext.jar width=200 height=140>
<param name=chart value="plotter">
<param name=seriesCount value=2>
<param name=plots_0 value="20|20,40|40,60|40,80|30">
<param name=plots_1 value="10|60,30|75,50|60,70|70,90|90">
<param name=seriesLabels value="A,B">
<param name=seriesLabelsOn value=true>
<param name=plotSize value=20>
<param name=seriesLabelColors value="black,white">
</applet>
Use the seriesLabelStyle to show the series labels over, under the plot or floating.
<applet code=com.objectplanet.chart.ChartApplet
archive=chart.ext.jar width=200 height=140>
<param name=chart value="plotter">
<param name=seriesCount value=2>
<param name=plots_0 value="20|20,40|40,60|40,80|30">
<param name=plots_1 value="10|60,30|75,50|60,70|70,90|90">
<param name=seriesLabels value="data a, data b">
<param name=seriesLabelsOn value=true>
<param name=plotSize value=6>
<param name=seriesLabelStyle value=floating>
</applet>
The legend is turned on using the legendOn parameter.
<applet code=com.objectplanet.chart.ChartApplet
archive=chart.ext.jar width=200 height=140>
<param name=chart value="plotter">
<param name=seriesCount value=2>
<param name=plots_0 value="10|30,30|20,50|40,70|40,90|30">
<param name=plots_1 value="5|50,20|70,35|60,55|75,70|60,80|70,95|90">
<param name=legendOn value=true>
<param name=legendLabels value="serie 1, serie 2">
<param name=connectedLinesOn value=true>
</applet>
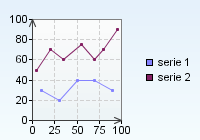
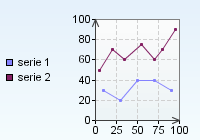
The legend position is controlled using the legendPosition parameter. The position can be right (default), left, top, or bottom.
<applet code=com.objectplanet.chart.ChartApplet
archive=chart.ext.jar width=200 height=140>
<param name=chart value="plotter">
<param name=seriesCount value=2>
<param name=plots_0 value="10|30,30|20,50|40,70|40,90|30">
<param name=plots_1 value="5|50,20|70,35|60,55|75,70|60,80|70,95|90">
<param name=connectedLinesOn value=true>
<param name=legendOn value=true>
<param name=legendLabels value="serie 1, serie 2">
<param name=legendPosition value=bottom>
</applet>
Control the font used for the legend labels using the legendFont parameter.
<applet code=com.objectplanet.chart.ChartApplet
archive=chart.ext.jar width=200 height=140>
<param name=chart value="plotter">
<param name=seriesCount value=2>
<param name=plots_0 value="10|30,30|20,50|40,70|40,90|30">
<param name=plots_1 value="5|50,20|70,35|60,55|75,70|60,80|70,95|90">
<param name=connectedLinesOn value=true>
<param name=legendLabels value="Data A, Data B">
<param name=legendLabelsOn value=true>
<param name=legendFont value="Arial, bold, 14">
</applet>
The color of the legend boxes are the same as the sample colors. Use the legendColors parameter to explicitly set the legend colors.
<applet code=com.objectplanet.chart.ChartApplet
width=200 height=140>
<param name=chart value="plotter">
<param name=seriesCount value=2>
<param name=plots_0 value="10|30,30|20,50|40,70|40,90|30">
<param name=plots_1 value="5|50,20|70,35|60,55|75,70|60,80|70,95|90">
<param name=seriesColors value="blue,red">
<param name=connectedLinesOn value=true>
<param name=legendOn value=true>
<param name=legendLabels value="Data A, Data B">
<param name=legendFont value="Arial, bold, 14">
<param name=legendColors value="red,blue">
</applet>
Any legend box may be replaced by an image.
<applet code=com.objectplanet.chart.ChartApplet
archive=chart.ext.jar width=200 height=140>
<param name=chart value="plotter">
<param name=seriesCount value=2>
<param name=plots_0 value="10|30,30|20,50|40,70|40,90|30">
<param name=plots_1 value="5|50,20|70,35|60,55|75,70|60,80|70,95|90">
<param name=seriesColors value="blue,red">
<param name=connectedLinesOn value=true>
<param name=legendOn value=true>
<param name=legendLabels value="Data A, Data B">
<param name=legendImage_0 value="images/blue-ball-small.gif">
<param name=legendImage_1 value="images/magenta-ball-small.gif">
</applet>
Turn on the value labels using the XValueLabelsOn and XValueLabelsOn parameter. Use the XValueLabelsOn_N and YValueLabelsOn_N parameter option to turn on or off the value labels for each data series.
<applet code=com.objectplanet.chart.ChartApplet
archive=chart.ext.jar width=200 height=140>
<param name=chart value="plotter">
<param name=seriesCount value=2>
<param name=plots value="10|40,30|20,50|70,70|50,90|80">
<param name=plotStyle value=square_opaque>
<param name=plotSize value=14>
<param name=YValueLabelsOn value=true>
</applet>
Use the valueLabelStyle to display the labels over or under the sample point or to display floating value labels. The available values are center, over, under, floating.
<applet code=com.objectplanet.chart.ChartApplet
archive=chart.ext.jar width=200 height=140>
<param name=chart value="plotter">
<param name=seriesCount value=2>
<param name=plots value="11|40,30|20,50|70,70|50,88|80">
<param name=plotStyle value=square_filled>
<param name=plotSize value=14>
<param name=XValueLabelsOn value=true>
<param name=YValueLabelsOn value=true>
<param name=valueLabelStyle value=floating>
</applet>
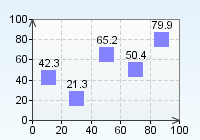
Use the XValueDecimalCount and YValueDecimalCount parameters to control the number of decimals used for the value labels. Use XValueDecimalCount_N and YValueDecimalCount_N to control the number of decimals per data series.
<applet code=com.objectplanet.chart.ChartApplet
archive=chart.ext.jar width=200 height=140>
<param name=chart value="plotter">
<param name=seriesCount value=2>
<param name=plots value="11|42.3,30|21.3,50|65.2,70|50.4,88|79.9">
<param name=plotStyle value=square_filled>
<param name=plotSize value=14>
<param name=YValueLabelsOn value=true>
<param name=YValueDecimalCount value=1>
<param name=valueLabelStyle value=over>
</applet>
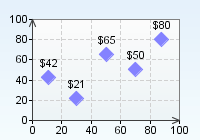
You can add a prefix and postfix to the value labels using the XValueLabelPrefix, XValueLabelPostfix and YValueLabelPrefix, YValueLabelPostfix parameters. To set a pre- and postfix per data series, add a _N (where N is the series number) to each parameter.
<applet code=com.objectplanet.chart.ChartApplet
archive=chart.ext.jar width=200 height=140>
<param name=chart value="plotter">
<param name=seriesCount value=2>
<param name=plots value="11|42.3,30|21.3,50|65.2,70|50.4,88|79.9">
<param name=plotStyle value=diamond_filled>
<param name=plotSize value=14>
<param name=YValueLabelsOn value=true>
<param name=YValueLabelPrefix value="$">
<param name=valueLabelStyle value=over>
</applet>
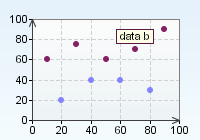
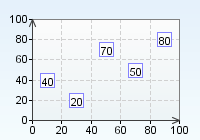
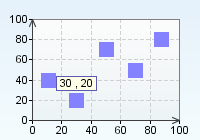
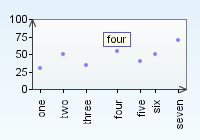
You can set a label per any specific plot in the chart. The labels can either be displayed below the chart grid, floating above a plot when the mouse moves over it, or both below and floating.
<applet code=com.objectplanet.chart.ChartApplet
archive=chart.ext.jar width=200 height=140>
<param name=chart value="plotter">
<param name=rangeOn value="left">
<param name=plots value="5|30|x|one,20|50|x|two,35|35|x|three,55|55|x|four,70|40|x|five,80|50|x|six,95|70|x|seven">
<param name=plotSize value="4">
<param name=plotLabelsOn value="true">
<param name=plotLabelAngle value="270">
<param name=plotLabelStyle value="below_and_floating">
<param name=XValueLinesOn value="false">
<param name=YValueLinesOn value="false">
</applet>
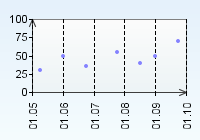
You can set custom labels that will be displayed on the X range axis using XRangeLabels parameter.
<applet code=com.objectplanet.chart.ChartApplet
archive=chart.ext.jar width=200 height=140>
<param name=chart value="plotter">
<param name=rangeOn value="left">
<param name=plots value="5|30,20|50,35|35,55|55,70|40,80|50,95|70">
<param name=plotSize value="4">
<param name=XRangeLabels value="0|01.05,20|01.06,40|01.07,60|01.08,80|01.09,100|01.10">
<param name=XRangeLabelAngle value="270">
<param name=YValueLinesOn value="false">
</applet>
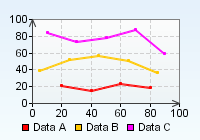
Use the seriesColors parameter to set the colors of the plot series and legend label boxes. You can either use the color names or the hex value (e.i. #c0a0f0) for the colors.
<applet code=com.objectplanet.chart.ChartApplet
archive=chart.ext.jar width=200 height=140>
<param name=chart value=plotter>
<param name=seriesCount value=3>
<param name=plots_0 value=20|21,40|16,60|24,80|19>
<param name=plots_1 value=5|39,25|52,45|57,65|51,85|37>
<param name=plots_2 value=10|84,30|74,50|79,70|88,90|60>
<param name=seriesColors value=red,orange,magenta>
<param name=connectedLinesOn value=true>
<param name=lineWidth value=2>
<param name=legendOn value=true>
<param name=legendLabels value="Data A, Data B, Data C">
<param name=legendPosition value=bottom>
</applet>
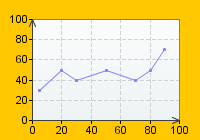
Set the chart component background color using the background parameter. This does not include the chart grid background color.
<applet code=com.objectplanet.chart.ChartApplet
archive=chart.ext.jar width=200 height=140>
<param name=chart value=plotter>
<param name=plots value="5|30,20|50,30|40,50|50,70|40,80|50,90|70">
<param name=connectedLinesOn value=true>
<param name=background value=orange>
</applet>
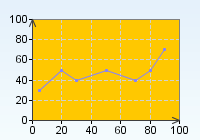
Set the color of the chart grid background using the chartBackground parameter.
<applet code=com.objectplanet.chart.ChartApplet
archive=chart.ext.jar width=200 height=140>
<param name=chart value=plotter>
<param name=plots value="5|30,20|50,30|40,50|50,70|40,80|50,90|70">
<param name=connectedLinesOn value=true>
<param name=chartBackground value=orange>
</applet>
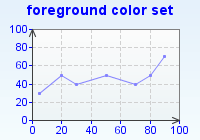
Set the chart component foreground color using the foreground parameter.
<applet code=com.objectplanet.chart.ChartApplet
archive=chart.ext.jar width=200 height=140>
<param name=chart value=plotter>
<param name=plots value="5|30,20|50,30|40,50|50,70|40,80|50,90|70">
<param name=connectedLinesOn value=true>
<param name=foreground value=blue>
<param name=chartTitle value="foreground color set">
</applet>
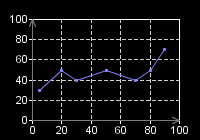
Set the foreground color of the chart grid elements.
<applet code=com.objectplanet.chart.ChartApplet
archive=chart.ext.jar width=200 height=140>
<param name=chart value=plotter>
<param name=plots value="5|30,20|50,30|40,50|50,70|40,80|50,90|70">
<param name=connectedLinesOn value=true>
<param name=chartForeground value=white>
<param name=foreground value=white>
<param name=chartBackground value=black>
<param name=background value=black>
</applet>
Through the applet parameters you can control how the chart is displayed.
You can turn on/off horizontal and vertical value lines using the XValueLinesOn and YValueLinesOn parameters.
<applet code=com.objectplanet.chart.ChartApplet
archive=chart.ext.jar width=200 height=140>
<param name=chart value=plotter>
<param name=plots value="5|30,20|50,30|40,50|50,70|40,80|50,90|70">
<param name=connectedLinesOn value=true>
<param name=XValueLinesOn value=false>
<param name=YValueLinesOn value=false>
</applet>

You can set the color of the value lines using the XValueLinesColor and YValueLinesColor parameter.
<applet code=com.objectplanet.chart.ChartApplet
archive=chart.ext.jar width=200 height=140>
<param name=chart value=plotter>
<param name=plots value="5|30,20|50,30|40,50|50,70|40,80|50,90|70">
<param name=connectedLinesOn value=true>
<param name=background value=lightGray>
<param name=chartBackground value=lightGray>
<param name=XValueLinesColor value=white>
<param name=YValueLinesColor value=white>
</applet>
The jumps in the value lines and range labels is controlled by the space available for the value lines and range labels. You can not control the jumps directly, but you can set the maximum number of lines you want using the XMaxValueLineCount and YMaxValueLineCount parameter.
<applet code=com.objectplanet.chart.ChartApplet
archive=chart.ext.jar width=200 height=140>
<param name=chart value=plotter>
<param name=plots value="5|30,20|50,30|40,50|50,70|40,80|50,90|70">
<param name=connectedLinesOn value=true>
<param name=XMaxValueLineCount value=3>
<param name=YMaxValueLineCount value=3>
</applet>

Set the pixel width of the lines using the lineWidth parameter.
<applet code=com.objectplanet.chart.ChartApplet
archive=chart.ext.jar width=200 height=140>
<param name=chart value=plotter>
<param name=plots value="5|30,20|50,30|40,50|50,70|40,80|50,90|70">
<param name=connectedLinesOn value=true>
<param name=lineWidth value=5>
</applet>

If the chart has multiple data series you can set the line width of each data series by comma seperation.
<applet code=com.objectplanet.chart.ChartApplet
archive=chart.ext.jar width=200 height=140>
<param name=chart value=plotter>
<param name=seriesCount value=3>
<param name=plots_0 value=20|21,40|16,60|24,80|19>
<param name=plots_1 value=5|39,25|52,45|57,65|51,85|37>
<param name=plots_2 value=10|84,30|74,50|79,70|88,90|60>
<param name=connectedLinesOn value=true>
<param name=lineWidth value="2,5,10">
</applet>
Use the plotSize parameter to set the size for each point in a serie.
<applet code=com.objectplanet.chart.ChartApplet
archive=chart.ext.jar width=200 height=140>
<param name=chart value=plotter>
<param name=plots value="5|30,20|50,30|40,50|50,70|40,80|50,90|70">
<param name=connectedLinesOn value=true>
<param name=plotSize value=10>
</applet>
The plotSize_N can be used to set the size per data series.
<applet code=com.objectplanet.chart.ChartApplet
archive=chart.ext.jar width=200 height=140>
<param name=chart value=plotter>
<param name=seriesCount value=3>
<param name=plots_0 value=20|21,40|16,60|24,80|19>
<param name=plots_1 value=5|39,25|52,45|57,65|51,85|37>
<param name=plots_2 value=10|84,30|74,50|79,70|88,90|60>
<param name=connectedLinesOn value=true>
<param name=plotSize_0 value=6>
<param name=plotSize_1 value=10>
<param name=plotSize_2 value=16>
</applet>
You can set circles, squares, and diamond shapes to the plot points on the data series. Use the plotStyle parameter to set the style of the plot series. The style can be circle, circle_filled (default), circle_opaque, square, square_filled, square_opaque, diamond, diamond_filled, or diamond_opaque.
<applet code=com.objectplanet.chart.ChartApplet
archive=chart.ext.jar width=200 height=140>
<param name=chart value=plotter>
<param name=plots value="5|30,20|50,30|40,50|50,70|40,80|50,90|70">
<param name=connectedLinesOn value=true>
<param name=plotSize value=10>
<param name=plotStyle value=square_opaque>
</applet>
The plotStyle can also use comma seperation to set the style per data series.
<applet code=com.objectplanet.chart.ChartApplet
archive=chart.ext.jar width=200 height=140>
<param name=chart value=plotter>
<param name=seriesCount value=3>
<param name=plots_0 value=20|21,40|16,60|24,80|19>
<param name=plots_1 value=5|39,25|52,45|57,65|51,85|37>
<param name=plots_2 value=10|84,30|74,50|79,70|88,90|60>
<param name=connectedLinesOn value=true>
<param name=plotSize_0 value=6>
<param name=plotSize_1 value=10>
<param name=plotSize_2 value=16>
<param name=plotStyle value=circle,square_opaque,diamond_filled>
</applet>
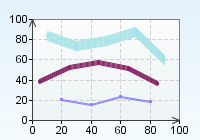
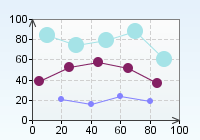
Use the plotImage parameter to set an image to highlight all plots. Use plotImage_N parameter to set an image to highlight all plots in the serie. Use plotImage_N_M to highlight the specific sample.
<applet code=com.objectplanet.chart.ChartApplet width=200 height=140>
<param name=chart value=plotter>
<param name=seriesCount value=3>
<param name=plots_0 value=20|21,40|16,60|24,80|19>
<param name=plots_1 value=5|39,25|52,45|57,65|51,85|37>
<param name=plots_2 value=10|84,30|74,50|79,70|88,90|60>
<param name=connectedLinesOn value=true>
<param name=plotImage_0 value="images/blue-ball-small.gif">
<param name=plotImage_1 value="images/magenta-ball.gif">
<param name=plotImage_2 value="images/cyan-ball-small.gif">
</applet>
You can add a horizontal line at a specified value position in the chart grid. The line can have any color and a label to the left of it. Use the targetValueLine_N parameter to add target value lines.
<applet code=com.objectplanet.chart.ChartApplet
archive=chart.ext.jar width=200 height=140>
<param name=chart value="plotter">
<param name=plots value="5|30|4,20|50|6,35|40|3,55|55|4,70|40|7,80|50|3,95|70|9">
<param name=targetValueLine_0 value="Target A, 15, red">
<param name=targetValueLine_1 value="Target B, 40, blue">
<param name=targetValueLine_2 value="Target C, 25, gray, value">
</applet>
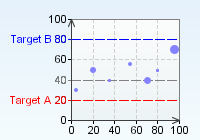
The first field in the target parameter is the label to be displayed. The second field is the value where it should be painted. The third parameter is the color (use the color name or a hex code) of the line and label. The fourth and optional parameter states if only the value should be displayed (value) or only the label (label). Both the label and the value are displayed by default.
You can add a URL or javascript call to any data series or plot point in the chart and have the applet open a new web page when the user double-clicks the plot point or legend entry. You must include the MAYSCRIPT parameter in the applet tag if you want to call javascript functions.
Have the url point to a web page containing another chart to create drilldown charts.
<applet code=com.objectplanet.chart.ChartApplet
archive=chart.ext.jar width=200 height=140 MAYSCRIPT>
<param name=chart value="plotter">
<param name=plots value="5|30,20|50,35|35,55|55,70|40,80|50,95|70">
<param name=plotSize value="6">
<param name=plotStyle value="dimond_filled">
<param name=url_0 value="chart1.html">
<param name=url_1 value="chart2.html">
<param name=url_2 value="chart3.html">
<param name=url_3 value="chart4.html">
<param name=url_4 value="javascript:winOpen('line.html', 200,500);">
</applet>
The parameter url_0 adds a URL to the first sample point in the above example. Use the parameter url to add a default url to all the samples.
In a chart having multiple data series, the url_N parameter adds a url to series N. The parameter url_N_M adds a url to sample M in data series N.
<applet code=com.objectplanet.chart.ChartApplet
archive=chart.ext.jar width=200 height=140>
<param name=chart value="plotter">
<param name=seriesCount value="2">
<param name=sampleValues_0 value="5|15,20|35,35|20,55|40,70|25,80|35,95|55">
<param name=sampleValues_1 value="5|45,20|65,35|50,55|70,70|55,80|65,95|85">
<param name=url_0_0 value="chart1.html">
<param name=url_1_0 value="chart2.html">
</applet>
The example above adds a url to the first plot point in the two data series of the chart.
You can also set the URLs programatically by calling setParameter("url_0", "myurl");
The parameter urltarget, urltarget_N, urltarget_N_M adds a target window where the new web page should be opened. The parameter labelURLTarget and labelURLTarget_N specifies the target widow for the anywhere labels with URLs. The default behavior is to open the new page in the same window.
The different parameter values are:
_self: Open new page in same window or frame.
_parent: Open in the parent window.
_top: Open in the top-level window.
_blank:Open in a new blank window.
name:Open in the frame or window with the specified name.
Use the singleClickURLOn parameter to use single click drilldowns.
The sizing of the chart grid is automatically calculated based on the size and position of other elements in the chart. You can explicitly set the chart grid by using the graphInsets parameter.
<applet code=com.objectplanet.chart.ChartApplet
archive=chart.ext.jar width=200 height=140>
<param name=chart value=plotter>
<param name=plots value="5|30,20|50,30|40,50|50,70|40,80|50,90|70">
<param name=connectedLinesOn value=true>
<param name=graphInsets value="0,0,0,0">
</applet>
The sequence of the graphInsets parameter value is top, left, bottom, right. If you use -1 for any of the fields, the default inset for that side will be set.
<applet code=com.objectplanet.chart.ChartApplet
archive=chart.ext.jar width=200 height=140>
<param name=chart value=plotter>
<param name=plots value="5|30,20|50,30|40,50|50,70|40,80|50,90|70">
<param name=connectedLinesOn value=true>
<param name=graphInsets value="30,30,30,30">
</applet>
The user can control the size and position of the chart grid at runtime by clicking on a chart grid edge and dragging it. Use the gridAdjustmentOn parameter to turn this behaviour on. The value can either be set to true, or a combination of top,left,bottom,right.
<applet code=com.objectplanet.chart.ChartApplet
archive=chart.ext.jar width=200 height=140>
<param name=chart value=plotter>
<param name=plots value="5|30,20|50,30|40,50|50,70|40,80|50,90|70">
<param name=connectedLinesOn value=true>
<param name=gridAdjustmentOn value=true>
</applet>
Color names:
black, blue, cyan, darkGray, gray, green, lightGray, magenta, orange,
pink, red, white, yellow